Using fine grained access control for search
Open Distro for Elasticsearch has extensive access control capabilities built right in. Of course, access control can prevent access to sensitive information, but it can also help you build applications that depend on Open Distro for Elasticsearch for search. Let’s explore this a little more.

Say your application uses standard HTTP endpoints to serve data to end users. So, a web user loads a webpage, the client-side Javascript fires off a HTTP request to the application endpoint for a specific type of data, the data is returned to the client-side Javascript, and the browser renders it on screen for the user. Your server code is doing some minor handling of the HTTP route and parameters, making a request to Elasticsearch based on this and manipulating the returned results to make it easily useable by the client-side Javascript. Pretty typical stuff.
When your application becomes sufficiently complex, you’ll probably find the code is generally repetitious. You’ll be writing almost the same methods over and over - listen for a HTTP request, process it, ask Elasticsearch, return results, yet with small, subtle differences. Not only is this boring to write, it represents a larger, harder to maintain codebase. So, how does access control fit into all this?
By varying the Open Distro for Elasticsearch users for types of different requests, you can change the data returned. In this scenario you have documents that represent items - these documents can contain not only public facing fields - price, colour, material, description, but also private fields like cost, suppliers, and performance. Your employees may need to see all the information from behind a special login while customers should only see the public information. Of course, you could write very similar server code for each, vary the _source in the Query DSL and reimplement loads of logic. Alternatively, you can let Open Distro do this work for you and gain the ability to centrally control field availability.
Let’s take this example - running this in query in Kibana Dev Tools (<yourhost>:<yourport>/app/dev_tools#/console) we will add a single item to the index ecommerce-items.
PUT ecommerce-items/_doc/brown-mug
{
    "title": "Brown Mug",
    "description": "This mug features a large handle and a marbled, brown ceramic design.",
    "price" : 5.99,
    "private" : {
        "cost" : 1,
        "supplier" : "Mug World"
     }
}
No matter what happens, we don’t want our customers to be able to see anything in the private object. We’ll use Open Distro’s built-in access control functionality to make this happen.
Creating a user & role
First up in Kibana we need to create a user. This user will be used by the application for serving public information, so we’ll call it public-item-user. First, go to the Security item from the side menu then click Internal users in the secondary menu. Now, click on the Create internal user button. This will take you to <yourhost>:<yourport>/app/opendistro_security#/users/create.
Under the heading “Credentials” enter the username of public-item-user and a password twice for validation. Then click the Create button. At this point we have created a user but it can’t do anything in Open Distro. To enable it to be useful, we’ll have to create and assign a role.
From the side menu, go back to Security and then Roles from the secondary menu then click the Create role button. You should be at <yourhost>:<yourport>/app/opendistro_security#/roles/create. Under the “Name” heading enter public-item-viewer into the “Name” text box. Then under the heading “Index Permissions” add the ecommerce-items in the “Index” field and then indices:data/read/search into the “Index Permissions” field. Finally, under the heading “Field level security” go to the “Exclude” field and enter private. When you’ve done all this, go to the bottom and click the Create button.
Before proceeding, let’s take a moment to examine why indices:data/read/search is the right permission for this situation. It grants users with this role the ability to search documents but not to manipulate them. If you scroll through the possibilities in the “Index Permissions” box you might notice the type crud and search which are permission groups. Permission groups bundle typically used permissions together as a shorthand; you could actually use these here, but you would also be granting far more permission than needed, so we’ll stick with a highly specific permission that can do very little (more on that later).
At this point you have a user, public-item-user and a role public-item-viewer but they aren’t connected. In Open Distro this is called mapping. To map a role to a user, go back to Security and then select Roles and find our user (public-item-viewer) and click on it (you may need to use the search box). It should bring you to <yourhost>:<yourport>/app/opendistro_security#/roles/view/public-item-viewer. Now go to the tab Mapped Users - the list will be empty so click Map users. At this point you’ll be at the URL <yourhost>:<yourport>/app/opendistro_security#/roles/edit/public-item-viewer/mapuser. Under the heading “Internal users” go to the “Internal users” field and select public-item-user. Then click Map.
Now your user (public-item-user) has all the powers provided by the role public-item-viewer. Let’s test it out by going to Kibana in a private or incognito window. This trick will allow you to be logged into two users at the same time. Go to Dev Tools (<yourhost>:<yourport>/app/dev_tools#/console) and enter the following query:
GET /ecommerce-items/_search
{
  "query": {
    "match" : {
      "title": "brown"
    }
  }
}
The result will show:
{
    ...,
    "hits" : [
        {
        "_index" : "ecommerce-items",
        "_type" : "_doc",
        "_id" : "brown-mug",
        "_score" : 0.13353139,
        "_source" : {
            "title" : "Brown Mug",
                "description" : "This mug features a large handle and a marbled, brown ceramic design.",
                "price" : 5.99
            }
        }
    ]
}
Notice that the private object is gone. Our user and role has filtered this data right out.
One additional note here - we set up these two roles to only have access to this particular index. That means that if, by some mistake or happenstance the credentials are released for these users or an application bug somehow allows for passing in other indices, you’re covered. No other index managed by Open Distro would be at risk of disclosure as access control is denied when querying. You can think of this as an implementation of the principle of least privilege.
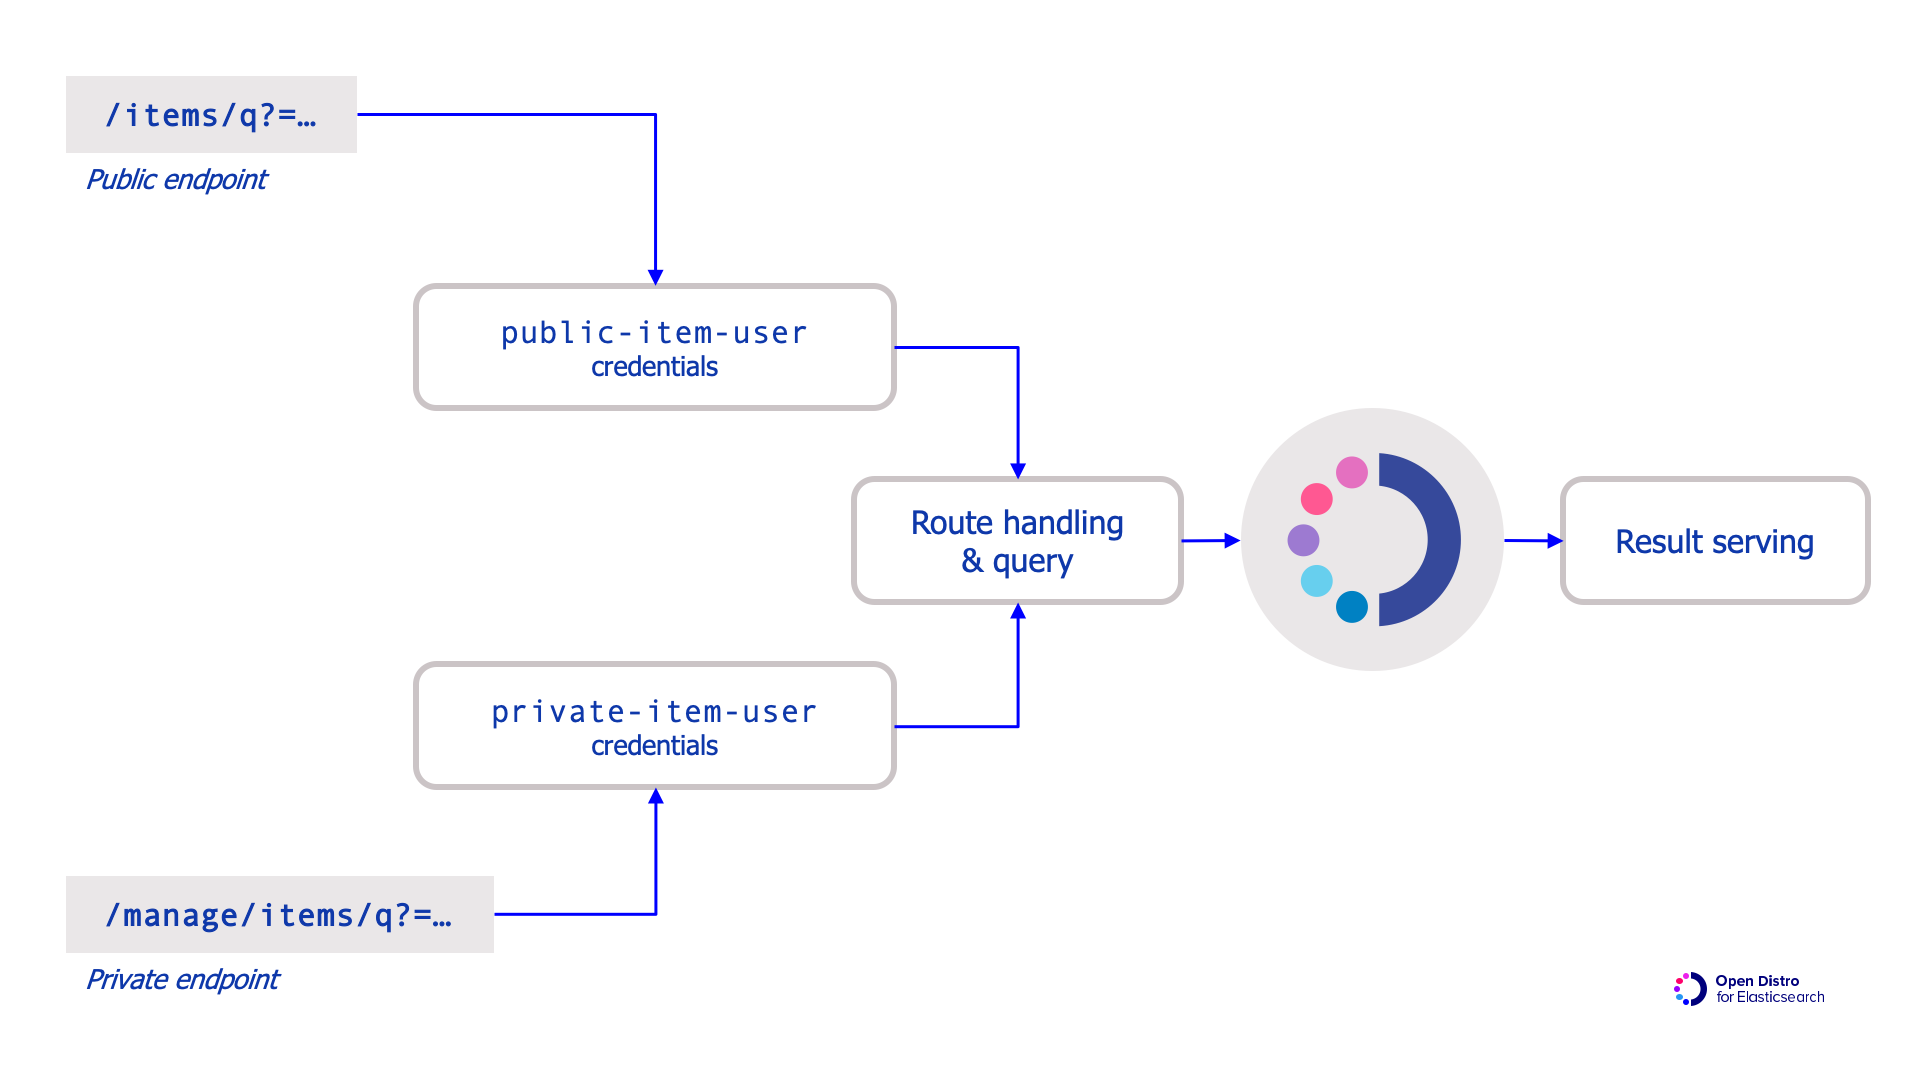
To set up a route for the employee section of your application, create a role called private-item-viewer that has permissions to see all information. Repeat the process above, except skipping the step where you exclude private in the “Field level security section”. Then create a user called private-item-user with the role of private-item-viewer. All of the requests from to backend for employees would uses this user to make the requests, enabling them to have access to all the fields in the object private.
Overview of the application, users / roles, & search
As far as your application is concerned, you only need a minimal abstraction to provide different routes with different information. The authenticated route for employees needing to see the private information could reuse all the query preparation, request, serializing, deserializing and rendering code as the public route. Later when your data changes and you want to include or exclude other parts of the document, you don’t have to modify your code, just alter the roles and the application will serve only the fields you specify.

Wrap up
By using the access control features of Open Distro for Elasticsearch you can reduce the amount of code needed to implement an application that serves differing data from the same index depending on the situation. The pattern outlined above moves the responsibility of data visibility from the application to the search engine. In this way your application can be simpler and you gain centralized, code-free control at the data level.
This pattern can be generalized to many other situations too. Say you have documents that are sensitive to two different groups and neither can see the whole document. Additionally, you have another group that needs to see the whole document, perhaps for security or compliance reasons. Using the same pattern of users, roles and permissions to provide differing visibility of the data with the same queries. But that is a story for another time…


