


Developer guide: Integrating multiple data sources using OpenSearch Dashboards and plugins
OpenSearch introduced support for multiple data sources in version 2.4, allowing users to explore, visualize, and manage data from self-managed clusters and Amazon OpenSearch Service. In version 2.14, OpenSearch Dashboards plugins have been integrated to support multiple data sources. Users can now access data from remote clusters within OpenSearch Dashboards core and its plugins, expanding the range of available data sources. For a list of supported plugins, refer to List of supported plugins/features.
This post provides developers with a concise guide to integrating OpenSearch Dashboards plugins with multiple data sources. If you’re unfamiliar with the concept of multiple data sources, we recommend starting with the article Configuring and using multiple data sources to build a solid foundation before exploring plugin integration.
Getting started
This tutorial shows you how to seamlessly integrate multiple data sources with OpenSearch Dashboards plugins. We provide the necessary instructions and examples to help you implement, configure, and start using multiple data sources effectively.
Step 1: Set up a local development environment
Before proceeding, set up a local development environment for OpenSearch Dashboards by following the developer guide. Once your Dashboards instance is running, generate your own plugin using the OpenSearch Dashboards Plugin Generator with the following CLI command:
node scripts/generate_plugin --name my_plugin_name
Upon successful plugin generation, you should see the following folder structure:
⋊> ~/OpenSearch-Dashboards/plugin/my_plugin_name                                                                                                                                                                                  (base) 00:33:34
.
├── README.md
├── common
│   └── index.ts
├── opensearch_dashboards.json
├── package.json
├── public
│   ├── application.tsx
│   ├── components
│   │   └── app.tsx
│   ├── index.scss
│   ├── index.ts
│   ├── plugin.ts
│   └── types.ts
├── server
│   ├── index.ts
│   ├── plugin.ts
│   ├── routes
│   │   └── index.ts
│   └── types.ts
├── translations
│   └── ja-JP.json
└── tsconfig.json
Refer to the documentation for more information about the OpenSearch Dashboards Plugin Generator. Before using multiple data sources, enable the data_source.enabled setting, which is disabled by default. Open the opensearch_dashboards.yml file, set data_source.enabled: true, and save the change.
Step 2: Configure the plugin to add dependencies
In your Dashboards plugin’s opensearch_dashboards.json file, add the Data Source and Data Source Management plugins to the optionalPlugins section, as shown in the following example. The Data Source plugin provides clients for connecting to multiple data sources, while the Data Source Management plugin offers generic interfaces for consuming data source components, such as a data source menu or selector.
{
  "id": "blogExamplePlugin",
  "version": "1.0.0",
  "opensearchDashboardsVersion": "opensearchDashboards",
  "server": true,
  "ui": true,
  "requiredPlugins": ["navigation"],
  "optionalPlugins": ["dataSource", "dataSourceManagement"]
}
Step 3: Add the data source parameter to server-side plugins
Server side: Verify that the multiple data sources feature is enabled and register the plugin API accordingly.
If your Dashboards plugin depends on a new API provided by your server-side plugin, you can register the schema for the API or pass the request path as a parameter during initialization. To register the custom API schema, use the interface provided by the Data Source plugin during plugin initialization. See the following example snippet:
// server/plugin.ts
import { DataSourcePluginSetup } from '../../../src/plugins/data_source/server';

export interface pluginDependencies {
  dataSource: DataSourcePluginSetup;
}

export class BlogExamplePluginPlugin
  implements Plugin<BlogExamplePluginPluginSetup, BlogExamplePluginPluginStart> {
  private readonly logger: Logger;

  constructor(initializerContext: PluginInitializerContext) {
    this.logger = initializerContext.logger.get();
  }

  public setup(core: CoreSetup, { dataSource }: pluginDependencies) {
    const router = core.http.createRouter();

    const dataSourceEnabled = !!dataSource;
    if (dataSourceEnabled) {
        dataSource.registerCustomApiSchema(BlogExamplePluginPlugin);
    }
    // Register server side APIs. It will be introduced in the next section.
    defineRoutes(router, dataSourceEnabled);
    return {};
  }
  ....
}
Step 4: Register server-side APIs with OpenSearch and the multiple data sources client
Each connected OpenSearch cluster receives a unique data source ID (UUID), which OpenSearch Dashboards uses to identify the cluster. To register server-side APIs, set up the API route with dataSourceId as an optional query parameter, as shown in the following configuration. This route handler will be invoked for GET requests matching the specified path. If dataSourceId is provided, use the multiple data sources client to query the remote cluster based on the ID. Otherwise, use the OpenSearch client to query the local cluster. Refer to Multi Data Source Client Management for more information about the multiple data sources client.
import { IRouter } from '../../../../src/core/server';
import { schema } from '@osd/config-schema';

export function defineRoutes(router: IRouter, dataSourceEnabled: boolean) {
  router.get(
    {
      path: `/api/blog_example_plugin/example`,
      validate: {
        query: schema.object({
          dataSourceId: schema.maybe(schema.string({ defaultValue: '' }))
        }),
      },
    },
    async (context, request, response) => {
      let resp;
      if (dataSourceEnabled && request.query.dataSourceId) {
        const dataSourceId = request.query.dataSourceId;
        const client = await context.dataSource.opensearch.getClient(dataSourceId)
        resp = await client.cat.indices();
      } else {
        resp = await context.core.opensearch.client.asCurrentUser.transport.request({
          method: 'GET',
          path: `_cat/indices`,
        });
      }
      return response.ok({
        body: resp.body,
      });
  });
}
Step 5: Register the Data Source Management plugin in a public folder
Extract the dataSourceManagement object in the plugin module into a public folder.
The Data Source Management plugin provides React components through a generic interface for your OpenSearch Dashboards plugin. To use the data source UI component interfaces, extract the dataSourceManagement object from the plugin module into a public folder and pass it to the main application:
# public/plugin.ts
import { DataSourceManagementPluginSetup } from '../../../src/plugins/data_source_management/public';

export interface PluginSetupDependencies {
  dataSourceManagement: DataSourceManagementPluginSetup;
}

export class BlogExamplePluginPlugin
  implements Plugin<BlogExamplePluginPluginSetup, BlogExamplePluginPluginStart> {
  public setup(
    core: CoreSetup,
    { dataSourceManagement }: PluginSetupDependencies
  ): BlogExamplePluginPluginSetup {
    core.application.register({
      id: 'blogExamplePlugin',
      title: PLUGIN_NAME,
      async mount(params: AppMountParameters) {
        const { renderApp } = await import('./application');
        const [coreStart, depsStart] = await core.getStartServices();
        return renderApp(
          coreStart,
          depsStart as AppPluginStartDependencies,
          params,
          dataSourceManagement
        );
      },
    });
    .....
}
Now use the UI component interfaces provided by the dataSourceManagement plugin.
With the dataSourceManagement plugin initialized, you can leverage its component interfaces. The following example demonstrates using the OpenSearch UI combobox as a base component to provide a UI for selecting data sources. It is stateful, fetching available data sources, returning the user’s selection through a callback function, and updating the UI accordingly.
const DataSourceSelector = dataSourceManagement.ui.DataSourceSelector;
const DataSourceSelectorComponent = (
  <DataSourceSelector
    savedObjectsClient={savedObjects.client}
    notifications={notifications.toasts}
    fullWidth={false}
    onSelectedDataSource={(ds) => setSelectedDataSources(ds)}
    disabled={false}
  />
);
Developers can use the onSelectedDataSource callback function to retrieve the selected remote data source ID. This function is triggered upon any change to the data source selection. Using the useState hook, developers can obtain the selected data source ID and use it to fetch related information and update the remaining page:
const [selectedDataSources, setSelectedDataSources] = useState<string[]>([]);
Step 6: Run a working example
With everything set up, you can combine the components into a working example plugin. First, add a data source selector in app.tsx:
 # public/components/app.tsx
  const [selectedDataSources, setSelectedDataSources] = useState<string[]>([]);

  const DataSourceSelector = dataSourceManagement.ui.DataSourceSelector;
  const DataSourceSelectorComponent = (
    <DataSourceSelector
      savedObjectsClient={savedObjects.client}
      notifications={notifications.toasts}
      fullWidth={false}
      onSelectedDataSource={(ds) => setSelectedDataSources(ds)}
      disabled={false}
    />
  );
Then add an onClickHandler to retrieve indexes based on the selected data source:
 # public/components/app.tsx
   const [indices, setIndices] = useState<string[]>([]);
   const onClickHandler = async () => {
     if (selectedDataSources.length === 0) {
       const resp = await http.get(`/api/blog_example_plugin/example`, { query: {} } );
       setIndices(resp);
    } else {
      const dataSourceID =selectedDataSources[0].id;
      // Use the core http service to make a response to the server API.
      const resp = await http.get(`/api/blog_example_plugin/example`, {
        query: {
          dataSourceId: dataSourceID,
        }
      });
      setIndices(resp);
    }
  };
Now combine the preceding function and React component:
retrun (
    ...
   <EuiHorizontalRule />
   {DataSourceSelectorComponent}
   <EuiHorizontalRule />
     <EuiTextColor>
       Selected: {selectedDataSources.map((ds) => ds.label).join(', ')}
   </EuiTextColor>
   <EuiHorizontalRule />
   <EuiButton type="primary" size="s" onClick={onClickHandler}>
     <FormattedMessage id="mayTest.buttonText" defaultMessage="Get Indices" />
   </EuiButton>
   <p>
     <FormattedMessage
       id="blogTest.indicesText"
       defaultMessage="Get indices: {data}"
       values={{ data: indices ? indices : 'Unknown' }}
     />
   </p>
  ...
)
Congratulations! Now you can run your plugins and use the pickers to select the desired data source(s).
To get indexes from a remote cluster, call datasource1, as shown in the following image.
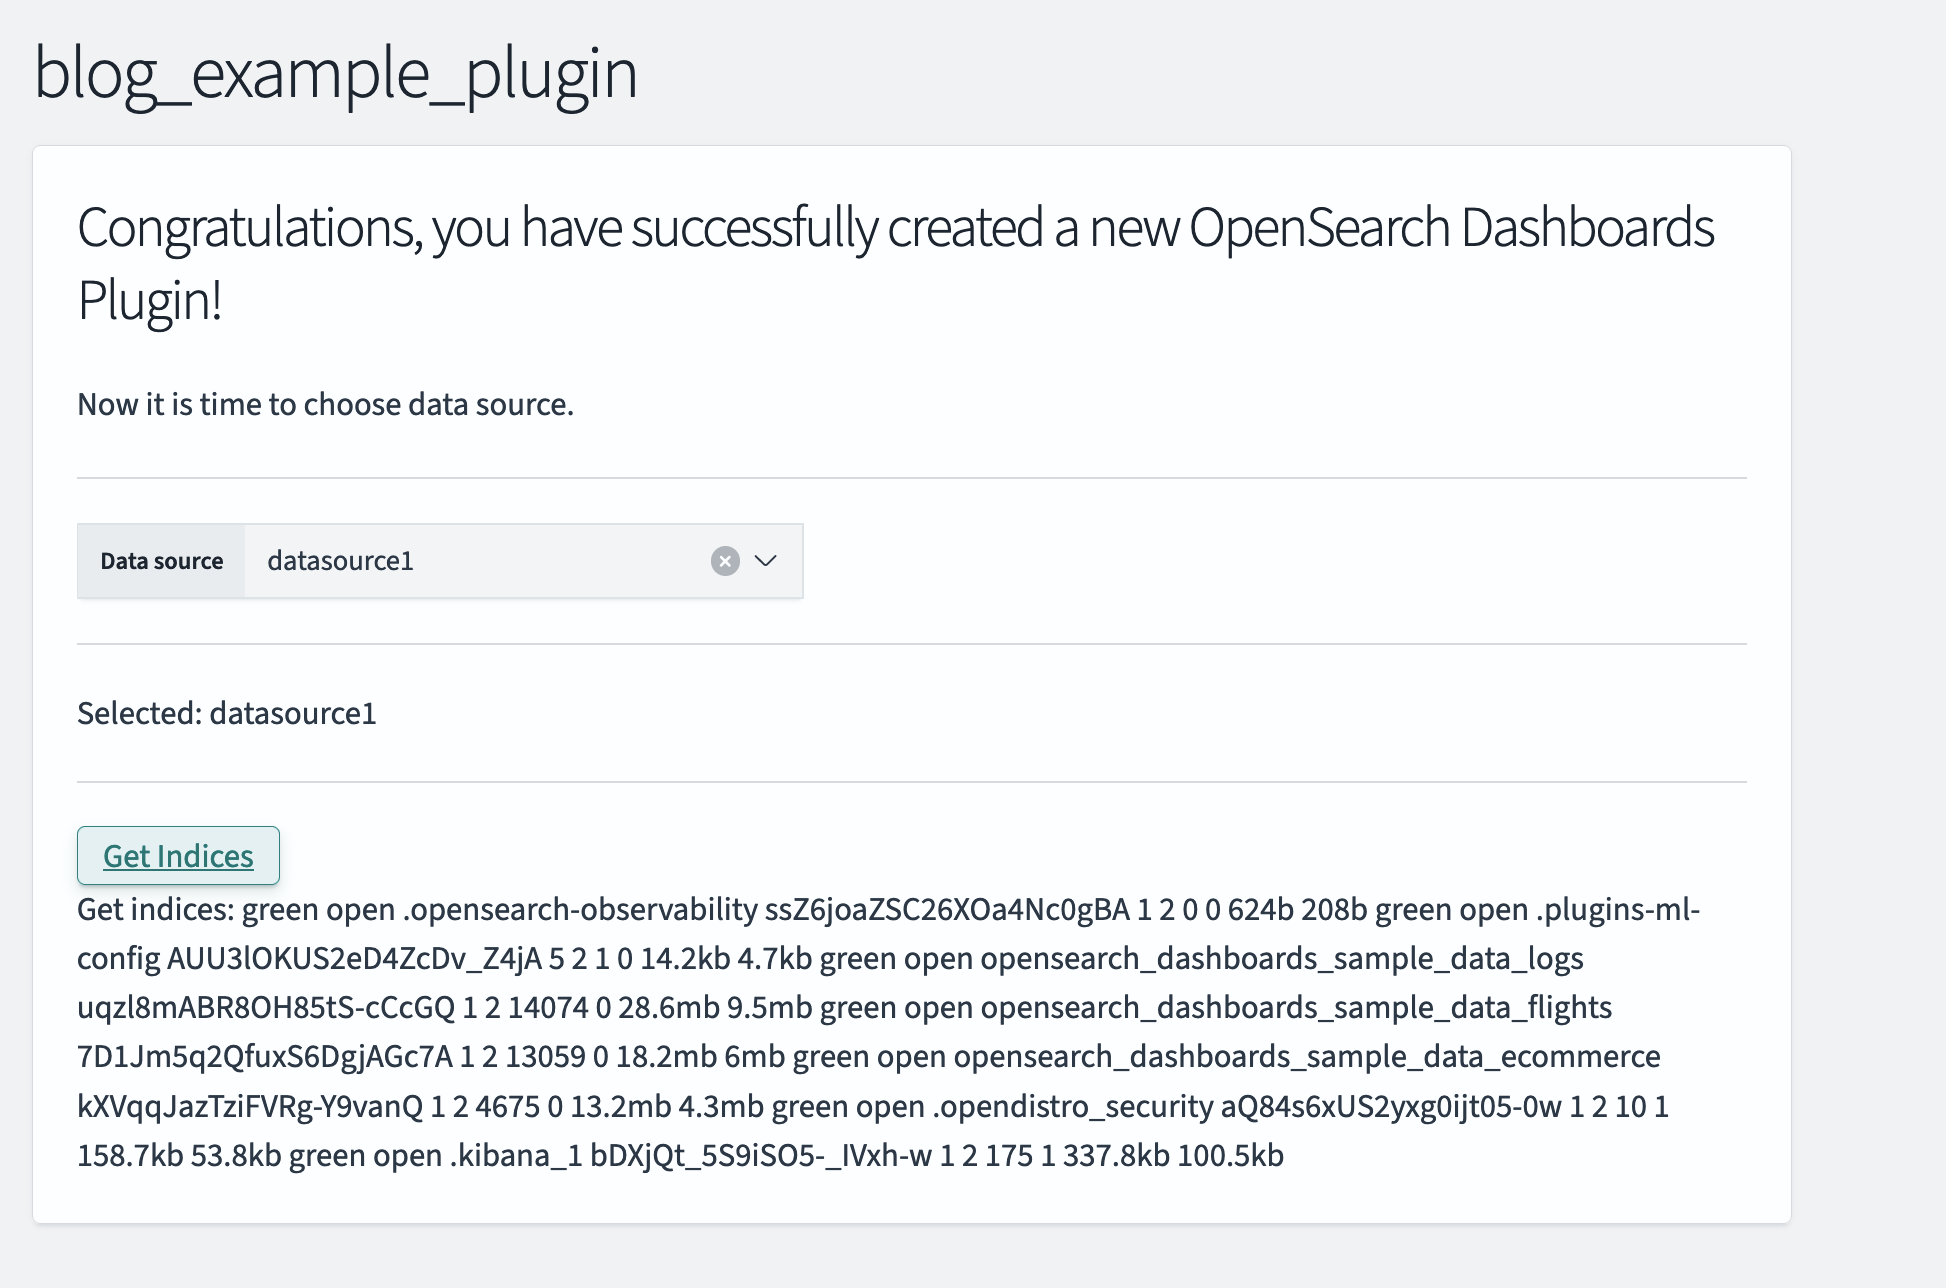
Refer to the blog_example_plugin repository for more information about the example plugin code.
Developing, testing, and debugging
Now that you’ve learned how to integrate multiple data sources with OpenSearch Dashboards plugins, let’s explore some advanced concepts and techniques.
Example plugins for multiple data sources
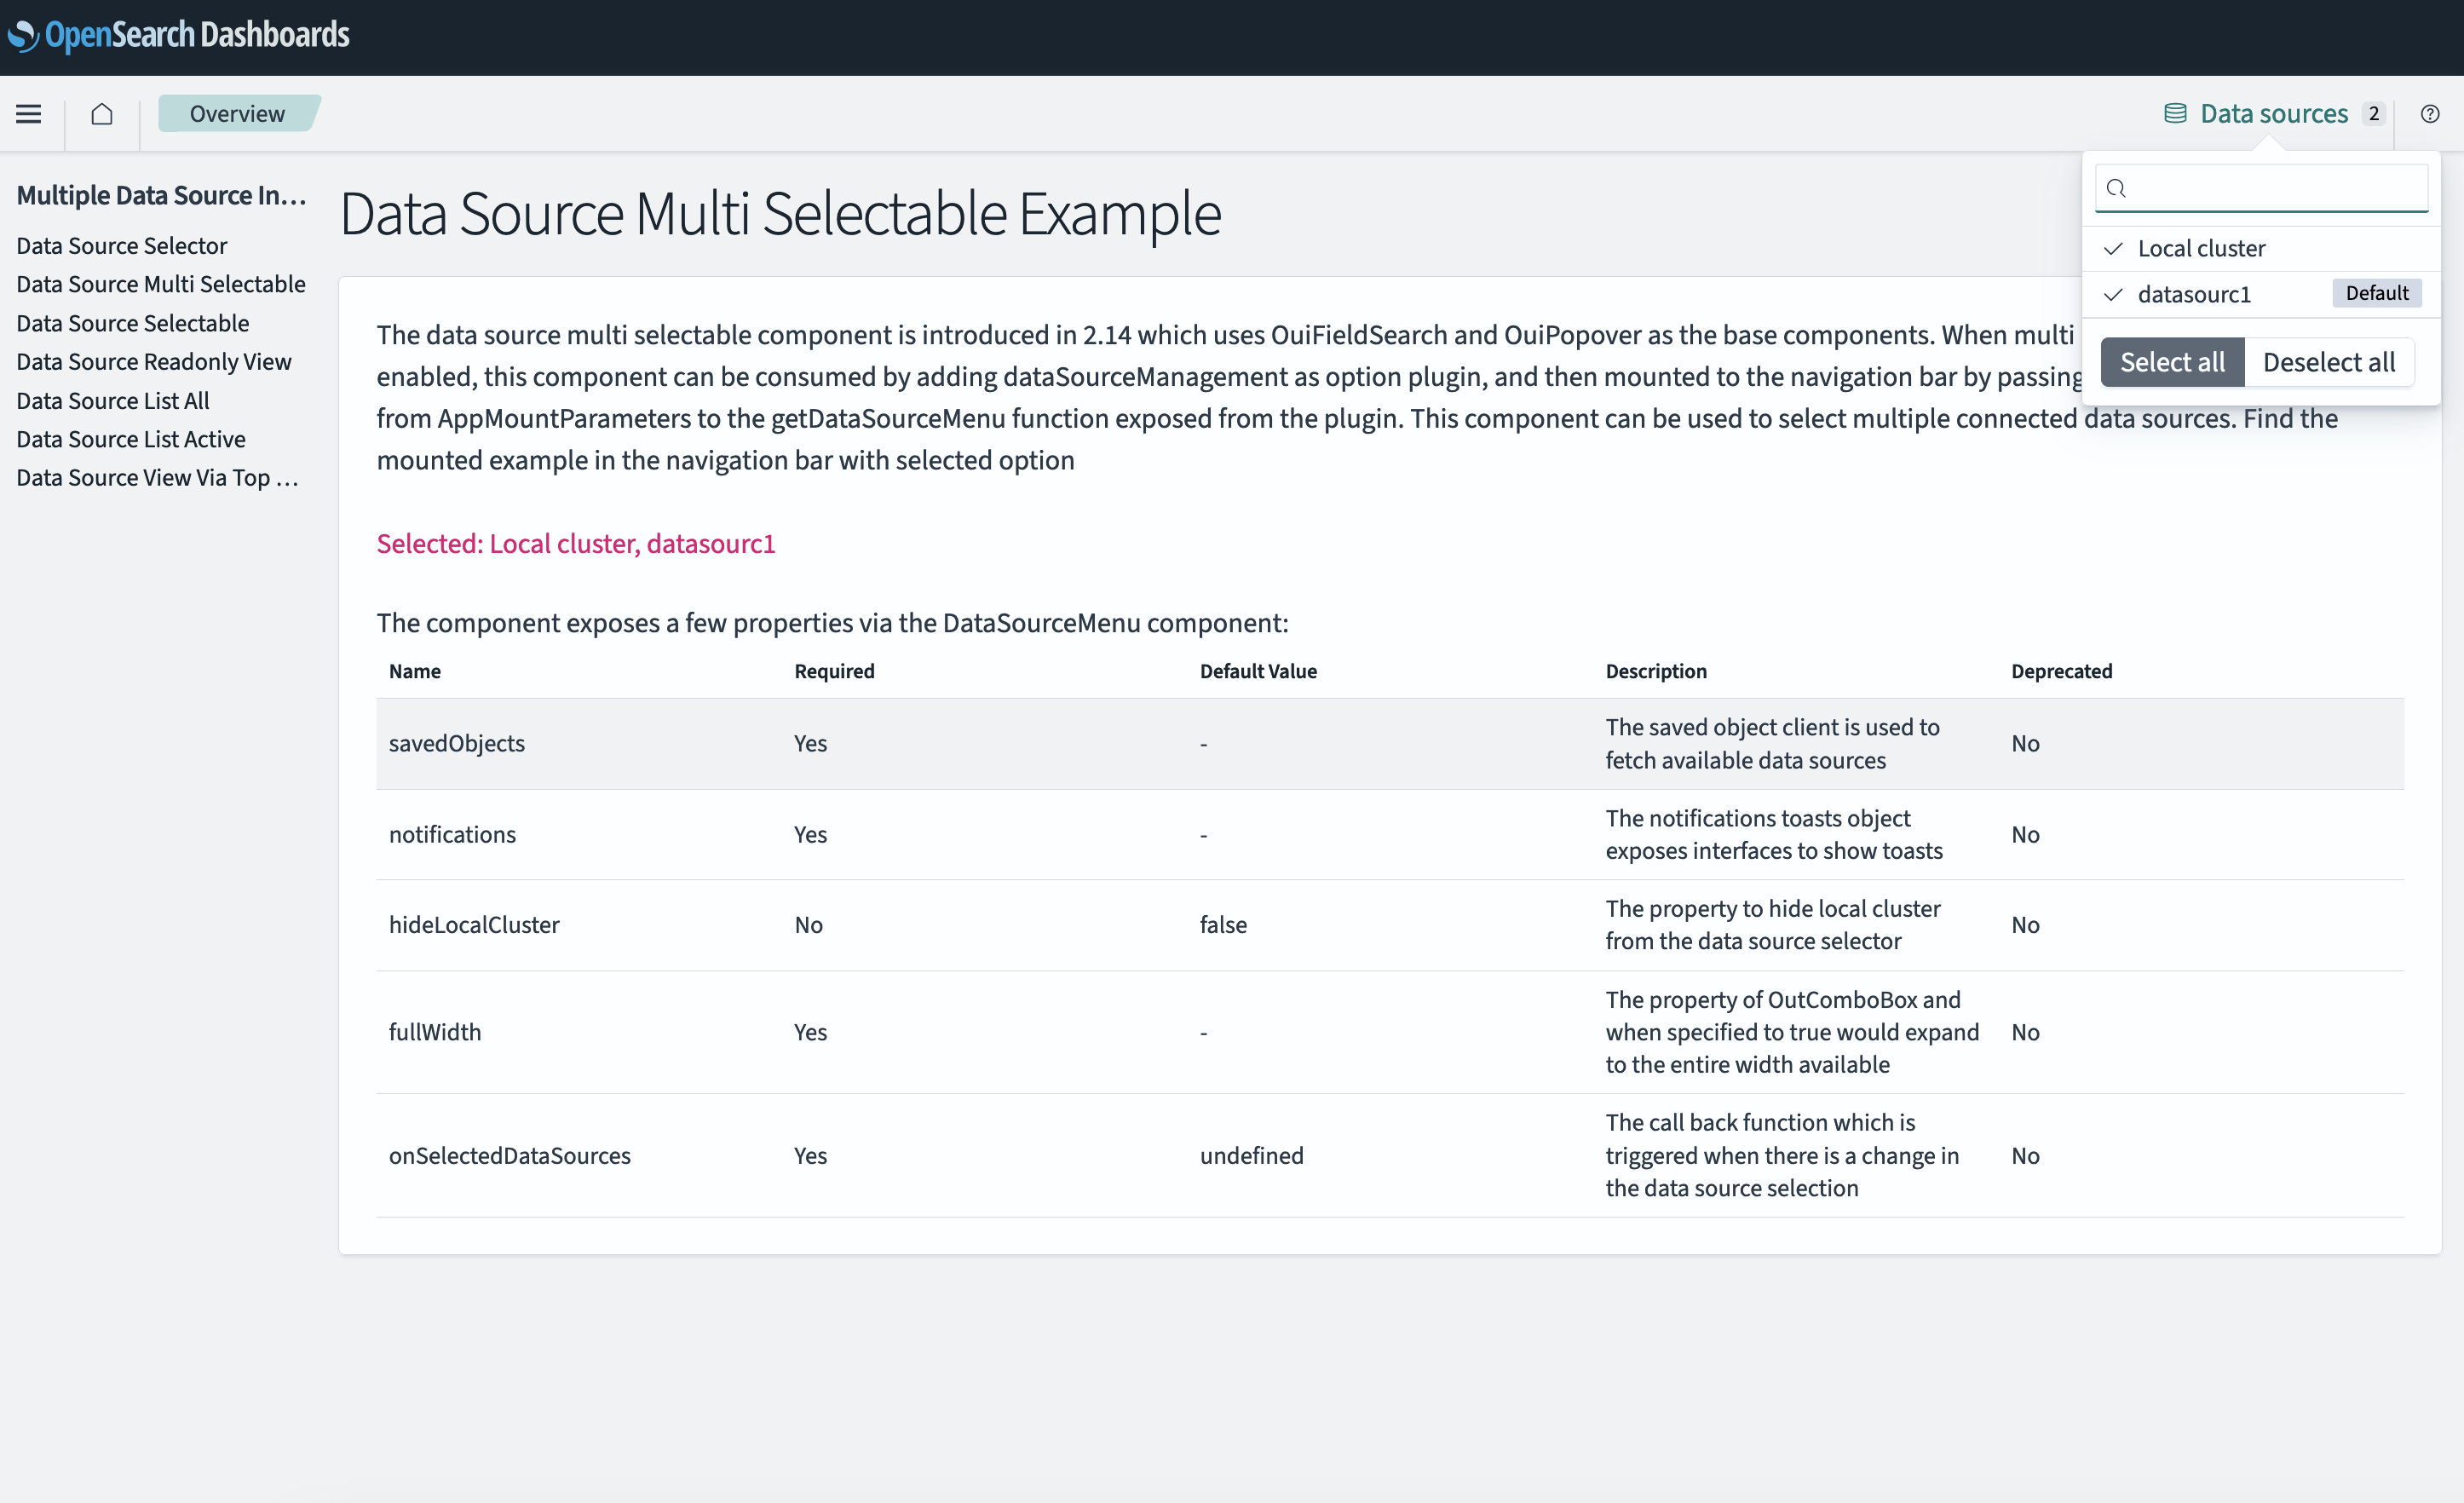
To provide a more intuitive and direct experience, we’ve included an example plugin so that developers can get started quickly with the components. You can enable the example plugins by running OpenSearch Dashboards with the following CLI command:
yarn start --run-examples
With OpenSearch Dashboards running, navigate to the page and select the menu on the left. Open Developer Examples and then select Multiple Data Sources Integration, as shown in the following image. On the right, you’ll find a list of pickers, each with a brief introduction and a list of properties. Feel free to experiment with the example plugin.
Data sources as saved objects
The data source is persisted as a saved object in the OpenSearch Dashboards system index. Upon creation, it is assigned a UUID as a unique identifier, and metadata such as the remote cluster version and associated plugins is gathered. This automatically generated data, along with user-provided information like the title, endpoint, and authentication methods, is stored as attributes of the data source object. Refer to the related code for the current object schema.
List of supported plugins/features
Starting in version 2.14, the following external OpenSearch Dashboards plugins support multiple data sources:
- Index Management
- Machine Learning
- Search Relevance
- Anomaly Detection
- Maps
- Security
- Notifications
- Query Workbench
- Trace Analytics
Multiple data sources functionality is also now available with the Time Series Visual Builder (TSVB), Vega, and Region Map visualization types.
Frequently asked questions
Q: Is any UI component provided by Data Source Management used in core OpenSearch?
A: A data source selector is now used in Dev Tools, the tutorial, and on the Saved Object management page. You can see the component after setting data_source.enabled to true in your opensearch_dashbards.yml file.
Q: Because a dashboard is a saved object, won’t it have an associated data connection?
A: A data source, represented as a saved object, is identified by its unique saved object ID. Saved objects created from data sources have a references section containing the ID, name, and type. This reference helps identify the associated data source for the saved object. Here’s an example of an index pattern reference:
"references": [
    {
        "id": "9dc4e190-08a0-11ef-901b-bb0301313422",
        "type": "data-source",
        "name": "dataSource"
    }
]
The visualization reference is slightly different because it points to the related index pattern and uses the index pattern ID to find the corresponding data source, as shown in the following example:
"references": [
    {
        "name": "kibanaSavedObjectMeta.searchSourceJSON.index",
        "type": "index-pattern",
        "id": "f1613e10-08a6-11ef-901b-bb0301313422"
        }
]
Conclusion
This blog post covered the process of integrating OpenSearch Dashboards plugins with multiple data sources. We encourage you to experiment with multiple data sources using the provided example plugins, developed by Lu Yu. This will allow you to experience the benefits of accessing multiple data sources within a single dashboard and enable your plugin to expose a wider range of data from remote clusters.